Export, Archive and Import Reports - Exercises
Export, Archive and Import Reports
Purpose: The purpose of this lesson is to show you how
to export an Excel report from a BA report, save the BA report in the BA Export
Archive and then how to import data from an Excel report to a BA report.
Scenario: In this exercise, an existing Business
Analytics report with writeback enabled cells have to be used in order to get an executed report with
a dataset in the end user mode.
Required Data
Purpose: The purpose of this exercise is to create two
reports that can be used in the exercises for exporting, archiving and importing
reports.
-
Design a report with the name BAEXPORT01.
General Exercises for Design
Report
-
Design a writeback enabled BA report with the name BAEXPORT02.
General Exercises for Writeback
Main Exercises
Export to Microsoft Excel Report
Purpose: The purpose of this exercise is to show you how
to export a BA report to a Microsoft Excel report and save it without the IFS
Business Analytics functionality.
Windows:
Export to Excel Report
- Open the BAEXPORT01 report in design mode.
- Click Execute. The report result
will be displayed in the end user mode.
- Click Export to Excel Report to open the
Export to Excel Report dialog box.
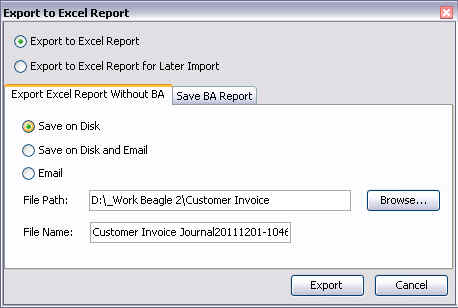
- Select Export to Excel Report option.
- In the Export to Excel Report Without BA tab, select Save on Disk
option.
- Click Browse to browse for the location in which the report
should be saved.
- Enter a name in the File Name field for the Microsoft Excel report that will be saved without
the IFS Business Analytics functionality.
- Click Export. A message will appear to inform you that the report
was successfully exported.
- Open the location in your hard disk which you browsed for in step 6. You
will find the BAEXPORT01 saved as a Microsoft Excel file.
Purpose: The purpose of this exercise is to show you how
to export a BA report to a Microsoft Excel report for the purpose of importing
it back to the original BA report later. Note that the original BA report should
have writeback enabled cells in order to have data imported to it. Data will be
imported only to the writeback enabled cells.
Windows:
Export to Excel Report
- Open the BAEXPORT02 report in design mode.
- Click Execute. The report result
will be displayed in the end user mode.
- Click Export to Excel Report to open the Export to Excel Report dialog box.
- Select Export to Excel Report for Later Import option.
- In the Export to Excel Report Without BA tab, select the Save on Disk
option.
- Enter the File Path and the File Name to save the Excel
report on disk.
- Click on the Save BA Report tab. The Save BA Report to Archive
check box will
be automatically selected.
Note: When exporting excel report for later import, it is
required to save the original BA report in the BA Export Archive.

- Select Save BA Report to Disk check box, if you need to
save the report with the Business Analytics design to a local disk location.
- Click Browse to browse for the location in which the report
should be saved with the Business Analytics design.
- Modify the name displayed in the Report Name field if you
want to save the BA report with a different name.
- Click Export. A message will appear to inform you that the report
was successfully exported.
- Click Manage BA Archive to open the
Manage BA Archive dialog box. You will find the BAEXPORT02 displayed
in the dialog box. You would also find the report saved as a Microsoft Excel
file in the file path you specified in step 6.
Required Data
Purpose: The purpose of this exercise is to modify the
BAEXPORT02 report you exported and saved as a Microsoft Excel report in
Export to Microsoft Excel
Report for Later Import exercise so that you can view the modifications when
you import it back to the original report.
Open the BAEXPORT02 report you saved as a Microsoft Excel report from
the file path you specified in step 6 of
Export to Microsoft Excel
Report for Later Import exercise. Note that data can be imported only to the
writeback enabled cells of a BA report. Therefore, ensure that you modify values
for writeback enabled cells for BAEXPORT02 when modifying the Microsoft
Excel report.
Purpose: The purpose of this exercise is to show you how
to import data to a BA report. The data imported in this exercise are
modifications made to the report without using IFS Business Analytics
functionality.
Scenario: The Microsoft Excel report you saved in
your hard disk in the Export
to Microsoft Excel Report for Later Import exercise and then modified in the
Modify Microsoft Excel Report
exercise will be used as the source file when importing data. The BA report that was saved in the BA Export
Archive in the Export to
Microsoft Excel Report for Later Import exercise will be used as the target BA report.
- Open a new IFS Business Analytics report. Go to the end user mode.
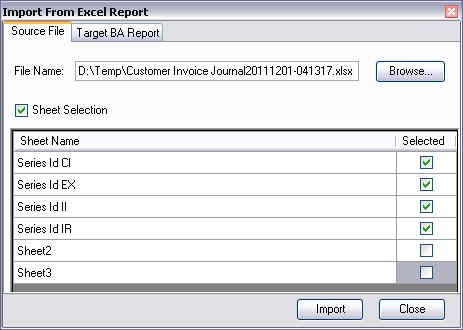
- Click Import from Excel Report to open the
Import From Excel Report dialog box.
- Click Browse in the Source File tab
to select the Microsoft Excel report you saved in your hard disk in
the Export to Microsoft
Excel Report for Later Import exercise.
- Click Sheet Selection. In the list of sheets, select the sheets
of the source Excel report that should be imported.
- In the Target BA Report tab, select
Report from BA Export Archive option to fetch the target report from the
BA export archive.
- select Re-Execute Before Import if you want the archived report
to execute and fetch latest dataset from the database.
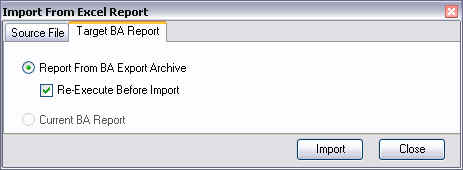
- Click Import. The BA report will be opened and the data values
from the Excel report will get imported to the BA report.
Scenario: In this exercise, the Excel report that was
exported in the previous exercise will be used as the source file with few
modifications to its data values. The BA report that was saved on the disk in
the previous exercise will be opened and used as the target BA report.
- Open the BA report that was saved on the disk in the
Export to Excel Report
for Later Import section. Execute the report to fetch latest dataset
from the database.
- Click Import from Excel Report to open the
Import From Excel Report dialog box.
- In the Source File tab, enter the File Name of the source
Excel report using Browse.
- Click Sheet Selection. In the list of sheets, select the sheets
of the source Excel report that should be imported.
- In the Target BA Report tab, select
Current BA Report option.
- Click Import. The data values from the Excel report will get
imported to the current BA report.
Writeback Imported Values to Archived BA Report
Scenario: In this exercise, the values imported to
writeback enabled cells of the BA report will be written back to IFS
Applications.
-
Use the BA report to to which you imported values in the
Import
from Microsoft Excel Report to Archived BA Report exercise or
Import from
Excel Report to the Current BA Report exercise. (Note: You should
not close the BA report you use in this exercise after importing values to
it without performing the writeback.)
-
Click Writeback on the Document Action
pane.
-
Click Collect Modified Data Sets.
-
Click Collective Writeback to update the values
directly to IFS Applications.
Manage BA Export Archive
Scenario: In this exercise, the BA report archived in
Export to Excel Report for
later Import section will modified in BA Export Archive.
- Open IFS Business Analytics and go to end user mode.
- Click Manage BA Export Archive to open the BA export archive.
- In the Report Selection tab, select a report and modify the
Expire date if you want a different date than the default suggested
date. Edit Notes, if needed.
Note: By default the Expire Date is set 60 days away from the archiving date.
- Select a report from Report Selection tab, and go to Report
Access tab. Enter the users and user groups who should have access to
the selected report in BA Export Archive.