Report Schedules are used to control the execution of reports. Use this when you want to automatically execute a report more than once or at a specified date time etc. When scheduling a report you specify the report parameters and other settings such as report language, date-time format, distribution details, as well as actions to be taken once the report had been executed. Once the Report Schedule has been created and is active the report will be executed at specified intervals mentioned in the schedule.
You need to have permission to print the reports you schedule
A Report Schedule is created. The schedule is either activated or not depending how you choose to set the active flag.
N/A
N/A
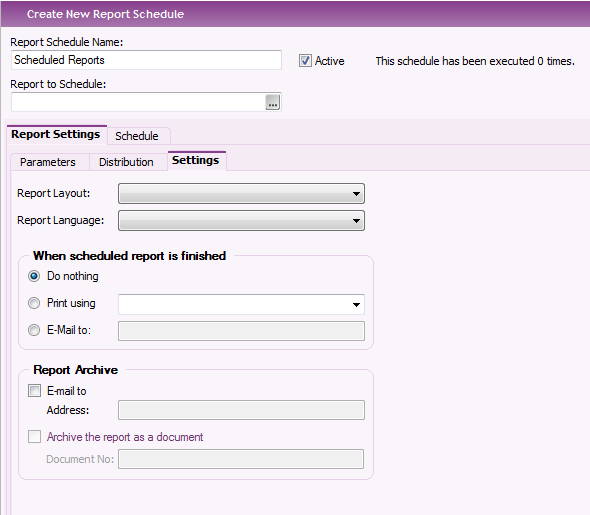
Open Create New Report Schedule page via Info Services/Scheduled Reports and the page below is displayed.

Figure 1: Create New Report Schedule page
In this page you can create new Report Schedules or manage already existing schedules, see Manage Report Schedules.
This is how you create a new Report Schedule:
Click New and specify the following in the header of the page:
The page is divided into two main parts.
Once all information is entered click Save to save the schedule. It will be executed based on the schedule parameters you have defined.
This is where you specify the report parameters, e.g. the selection criteria for the report, similar to when you use Search. The report parameters are the related to the actual report and differ based on which report you have chosen.
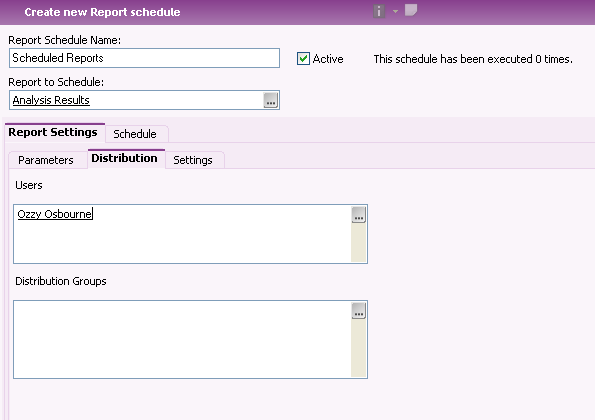
This is where you can specify to how to distribute the report, Users and Distribution Groups. Click on the ... to open the List of Values where you can select Users/Distribution Groups. These users will find the distributed reports via Report Archive/Distributed to me and in the Report Archive.

Figure 2: Report Settings/Distribution tab.
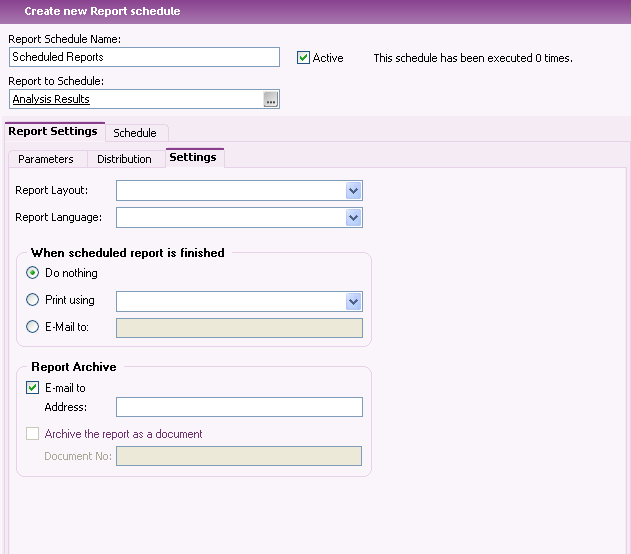
This is where you specify Report Layout and Report Language if you don't want to use the default settings for the report. You can also specify what to do once the schedule has executed a report, do nothing, print using a specific printer, or email to an email address. In addition you can specify what to do when the report is created in the Report Archive, either email to an email address or archive the report as a document. This option is only available for a few reports.

Figure 3: Report Settings/Settings tab
This is where you specify how often to run the report. The tab has two parts:
- Daily - The report is scheduled to be executed every day at a particular time.
- Weekly - The report is scheduled to be executed at a particular time on the selected day(s) of the week.
- Monthly - The report is scheduled to be executed at a particular time on the particular day of the month.
- Scheduled - The report is scheduled to be executed on a particular day at a particular time.
- Interval - The report is scheduled to be executed every hour and minute specified.
- Custom - The report is executed depending on the given custom expression. The custom expression must return a date (ex: SYSDATE + 1/3600)

Figure 4. Schedule Tab
You can view existing Report Schedules via Report Schedules page.

Figure 5. Report Schedules
Via the context menu, open with right mouse button, you can choose View Schedule to see the detailed information about the Report Schedule. This is the same page as in Create New Report Schedule.
If you need to execute the report outside the defined schedule select option Run from the context menu in the Report Schedules page.