In IFS Applications you will find tables in table/overview pages, e.g. where you can work with many records at a time. Tables are also available in master detail pages, e.g. pages that consist of a header and rows like the Customer Order page.
Note that you can personalize the order of columns, size and if they are visible or not. Read more in Adjust Columns in Tables.
N/A
N/A
N/A
In a table/overview page you can work with many objects at the same time. A table/overview page consists of columns, some columns are read-only and some may be locked for editing and some may be edited. Some table pages allow editing or to create new records, this is often basic data pages. More complex data is usually managed via a detail page or master/detail page.
Example of working in a table/overview page: Search or populate the page to find the objects you want to work with. Highlight one or several objects and open the context menu via right-mouse button where you have different actions available. E.g. show details and actions related to the business flow in IFS Applications.
The following topics are been discussed on using the Rows and Columns of tables in the Enterprise Explorer.
Click on a row to select it, the complete row will be highlighted. Double click in a cell to highlight the cell in order to copy or edit the values.
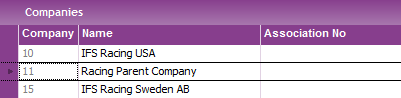
Figure 1. Cell selected
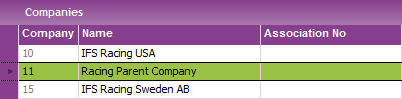
Figure 2. Row selected
Using the Mouse
You can selects row using the mouse. The first row you selecte is the current selected row and it is also the anchored row. The rows will be selected as you drag the mouse down in the table. If you drag the mouse up again, the previously selected rows which were below the anchored row are deselected and the rows above the anchored row are only been selected.
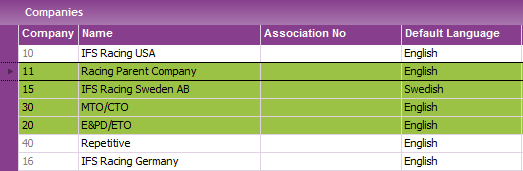
Figure 3: Multiple selected using the mouse . Row 2 is the
anchored row, row 5 is the last selected row
1 Anchored row, first selected row
Using the Keyboard
You can also select rows using the keyboard. Use Shift + Up Arrow, Shift + Down Arrow to select rows in the table. The first selected row will be the anchored row.
If the page allows it you can create now rows in a table/overview page. The New button in the page toolbar is enabled and you can also use F5 or click on the + button in the table header. The new row will be added to the row below where the cursor was pointing.
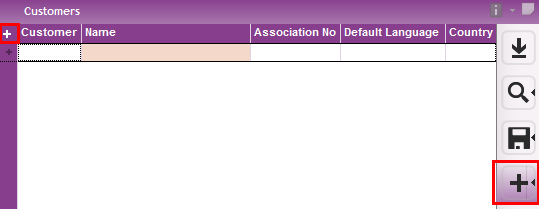
Figure 4: New Row on table
There are several ways to edit records in a table. You can place the cursor in the cell and just type the text or double click on the cell to bring the cell to the edit mode.
When you navigate to cells using keyboard, if the cell is editable it will bring the cell to the edit mode.
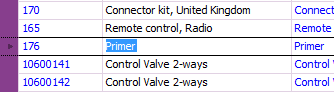
Figure 5: Cell edit mode
Some context menu options are generic and available in all table/overview pages and some are related to the business process/object. Place the cursors on the column header and righ-mouse click to open it.

Figure 6: Context menu on Column header
The following generic options are available:
Some context menu options are generic and available in all table/overview pages and some are related to the current object. Highlight one or several rows in a table/overview page and open the context menu via right-mouse button.

Figure 7: Context menu on selected row
The following options are generic:
As a complement to using search you can sort the populated data in your table/overview page by clicking on the Sort button in the column headers. By default the maximum number of rows allowed to sort is limited to 1000, due to performance reasons. You can change the maximum number of rows to sort in the Server tab in Application Options.
It is also possible to sort data via the Search dialog.
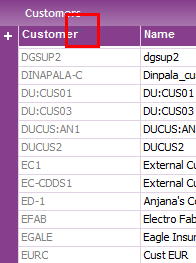
Figure 8: Sort button in column header
If the populated data exceeds the allowed maximum number of rows allowed an error message is displayed asking you to refine the search.
Note. Click to sort can have impact on the general performance of IFS Applications. Especially if the maximum number or rows to sort has been increased and many users are using the sort option.